After my last camping trip with friends to the Bruce Peninsula, I opened up the tent and dried it out on the patio in my backyard. I accidentally punctured the floor of the tent. I was thinking of simply using duck tape to patch the bottom and top side of the floor but it's probably not going to last and it would be messy. The dust tape will pick up dirt and will probably not last too long.
I found a website that has a bunch of repair tips for tents: http://www.mcnett-outdoor.com/repair-guide/tents/220.aspx
I'll sure try my seam sealer that I bought for the Ozark Trail tent to patch up the floor of this Outdoor Works Summit tent.
I will wait until spring to do this. I won't be using this tent for winter camping and it's kinda wet and cold outside now.
Sunday, December 2, 2012
Hammock resources
I ran across this one website that covers many aspects of hammock camping. I thought I'd share the link in case anyone else might be interested in the subject and for my own future reference:
http://www.tothewoods.net/
http://www.tothewoods.net/
Sunday, November 25, 2012
Get out there
 |
| Hammock setup for resting along the trail. |
The temperature these days is hovering around 0C (32F). It should not prevent anyone from heading out into local woods and spend a few hours kicking up the leaves. For me, every time I get out there is actually a preparation for winter camping, and I realize now how difficult it could be at making food. This time around, the wood I used was a bit damp inside so I got quite a bit of smoke and not enough heat. I could not get my water to boil--yes, I could forage for dry wood but I decided the water was warm enough to cook up my instant noodle soup. The other problem I realized I had was that my stove did not draw in enough air from the bottom, so I pierced a few more holes and hopefully next time, it will work better. I also just ordered a mini fan from ebay. I will buy some contraption to go along with this hobo stove (using the same idea as the Vital Stove) to force air into the stove. Finally, one last thing I realized also was that I carried too many pots. I bought a Chinook cook set. It costed me over $60 and I have wondered since then if it was a good buy. I have been using only the smallest pot and yet I have been carrying the entire set on my hikes all the time. Next time, everything but the smallest pot will stay at home.
Well, winter has not arrived yet but I sure will prepare more for it. Eventually, I will be able to do a winter camping trip in Algonquin or into some unmanaged crown land.
Saturday, October 27, 2012
Hammock camping
I quite like this style now. Yesterday, I was out on a hike. I knew I would spent a few hours in the woods and had wanted to relax in there, so I brought my hammock along. I also brought two tarps to protect me from the rain. This time, I set up my camp along the edge of a creek at the bottom of a hill. A tent would not fit well in this area with the slope and space and all but it works very well for a hammock and tarp!
Now, I just need to figure out how to lessen the bulkiness of my two backpacks! I carry a photo backpack along with a 60L backpack for my camping gears.
 |
| Hammock and tarp setup by a creek. |
Saturday, October 13, 2012
Camping on crown land, part 2
 |
| My tarp-hammock camping setup. |
Before lugging my large backpack in, I decided to do a quick survey of the area to find a place to build my campsite. The first part of the land is populated by the maple trees, succeeded by pine trees bordering the lake. While the evergreens maintain their luster green still, the maples were disrobed of their foliage. Bare, naked, most of them. The area was littered with maple leaves. The ground yellow, orange, and red. It was soft but wet.
 |
| Ascent -20F (-30C) Mummy Sleeping Bag |
After repeated failures to start a fire in my hobo stove (everything was damp and I did not have any birch bark), I decided to dump half of an InstaFire bag into the stove to help with the fire. From then on, the fire was more or less self-sustaining, enough at least for me to boil water to make some instant noodle soup. I could not eat it quite yet as it was still too hot. As I waited I looked up into the sky. It reminded me of a night at a cottage. While the darkness enveloped me, the sky was littered with star lights. It was an awesome sight in the middle of the forest. Again, while waiting for the noodles to cool down, I took out my camera and snapped some pictures of the sky but they really do not do justice. The field of stars was just unbelievably clear up there.
It must have been past 8pm when I decided to call it a night—I wanted to take more pictures but I could get lost in the darkness if I had ventured out. The sleeping system was good. I felt really warm. My feet were warm. My hands were warm. Everything felt great. Until 3am. I knew, even at 8pm, that the cold air was settling in. I was breathing it in and out. By 3am though, my body stopped producing enough heat to keep me warm. My back started to feel a bit chilly, not cold, but chilly enough to feel uncomfortable. By 4am, my feet started to feel chilly too. I knew my body was not generating enough heat. Every now and then, when I had to adjust my position in the hammock, I’d feel warm again as I had to use my muscles to push myself up one end of the hammock—oh yeah, I made one end higher than the other so I kept on slipping slowly down the hammock. Anyways, the temperature must have dropped to -5C or even lower. (When I finally got up at 6am to take pictures of the lake and the field of stars, it took merely 20 seconds or less for my exposed fingers to freeze so it must have been pretty cold.) I should have added to my sleeping system my summer sleeping bag as an under quilt. That should have kept me a lot warmer.
So, I think that was my *winter* camping in the bush! :)
Oh, I heard three howls. I believe they were of wolves. I also heard a couple of hoots. Maybe there were winter owls around there?
Monday, October 8, 2012
Bannock, part 3
This morning, for a hike I did today, I decided to make some bannock and take it with me. That would be my breakfast and snack when we rest. I used the same recipe as the last time except that I doubled everything as I wanted to make enough bannock to last the entire trip. One thing I changed was the temperature I set the convection oven to. Instead of 170 degrees Celcius, I lowed it to 150 degrees. Before starting to bake, I allowed the dough to sit for 5 minutes or so--I went to do my other daily morning routine in the meantime. I then allowed the bannock to bake on the glass plate a little longer in the convection oven for a total of 20 minutes. At half time, I flipped the bannock over to bake the underside. The bannock came out better than before. The crust is not as golden brown as before, just golden. The crust was softer than before, softer than a french baguette.
Sunday, October 7, 2012
Storing cooking oil
For my last camping trip to Cyprus Lake over a month ago, I thought it'd be smart to carry some cooking vegetable oil in an empty hot pepper glass bottle. Today, when I took out the bottle to use the oil to coat the blades of my knifes, I saw some greenish brown spots at the bottom and on the side wall of the bottle. What the heck? How can mold grow in oil? I ran some searches on Google and oddly enough, mold does grow in oil, or maybe it's because of contaminants from the air and what not that allowed for the mold to grow? Well, I poured out the oil--it looks clean to the naked eyes--and tried to hot wash the bottle. I poured really hot water into the bottle but nothing seemed to work to remove the mold. It looks like the mold has taken root on the imperfect surface of the bottle. As I cannot get a brush into the bottle, I had to throw away the bottle. It is unfortunate because I like the bottle. It is small and light for carrying cooking oil for camping.
Saturday, October 6, 2012
Bannock, part 2

- 1/2 cup of all-purpose flour
- 1/3 tablespoon of baking powder
- 1/6 teaspoon of salt
- 1 teaspoon of brown sugar
- 1/6 cup of raisin
- Water as necessary to get a certain dough consistency ... maybe 1/3 cup ... not sure how much water actually
The crust is crunchy. The inside is soft.
Maybe I should bake at a lower temperature for a bit longer for a softer crust?
Now ... I gotta figure out how to bake this bannock in a pot over my hobo stove.
Thursday, October 4, 2012
Bannock
On my next camping trip, I am thinking of going light on food. I have never brought dry food and rehydrate them later. The next time, I will bring only dry food and one of the bags I will bring with me will contain ingredients for bannock. I saw a number of recipes online and also saw an video of Kevin Callan on YouTube where he was making bannock. It sounded like a very simple recipe and it sounded nice. So, last night, I swang by the supermarket to pick up a few items I did not have at home. This morning I tried making it.
The original recipe calls for 3 cups of all purpose flour, 2 tablespoon of baking powder, 1 teaspoon of salt, 1/4 cup of melted butter, and 1 1/2 cups of water. I changed the recipe a tiny bit, to more like what Kevin was using. For my first attempt, I cut down the volume by 2/3, so I used 1 cup of flour, 2/3 tablespoon of baking powder, 1/3 teaspoon of salt. I did not use butter. After adding water and mixed the powder up, I added some brown sugar and sprinkled some raisin into the mix.
For cooking, I did not feel like baking it so I put some oil in a small pot and placed the mix in the pot over an electric oven at low temperature. As it was taking too long, I turned up the temperature dial. That was a mistake as the bannock started to burn a little. After a few minutes, I turned the bannock over to grill the other side. That side got burned a little too. Yikes.
After a few more minutes, I stopped the cooking process. The bannock tasted ok. I think I needed more brown sugar and more raisin. The bannock alone (without the sugar and raisin) has virtually no taste. Well, now I sort of know how to make bannock. I am ready for the next camping trip! :)
Sunday, September 30, 2012
Camping on crown land
This is interesting. I was viewing some YouTube videos when all of a sudden, I thought, "what about crown lands?" There is a lot of crown land in Ontario and they are not maintained by anybody. Crown land is pretty much what nature is supposed to be. Camping on crown land, except for some special places, is completely free. I am now thinking of finding these crown lands instead of going to those maintained campgrounds.
My next trip is probably going to be to Big Orillia Lake.
I found the following links very useful:
Crown Land discussion
Crown Land Use Policy Atlas in Ontario
My next trip is probably going to be to Big Orillia Lake.
I found the following links very useful:
Crown Land discussion
Crown Land Use Policy Atlas in Ontario
Camping with a hammock
This fall, I am thinking of going tent-less. Just bring in a hammock and a tarp over my head.
I have a Amazonas Travel Hammock that weighs next to nothing. The hammock is made out of nylon capable of supporting 250lbs. I had used it a couple of nights because I forgot to load my tent into the canoe once. Stupid me but that was a nice experience. It was a nice experience but I have to say it was hard to sleep at first--I kept on sliding to one side of the hammock as my body weight caused the strings to shift, and there were there mosquitoes.
Well, I will give it another try. This time around, I think I know how I will sleep in it, and I will also buy a mosquito net that spans the length of the hammock. I am also thinking I will have my DIY stove near my hammock to provide me some warmth. In addition to that, I will bring my foam mat to provide some insulation for my back.
The more I think about it, the more I want to be out there. It will be interesting.
Saturday, September 15, 2012
InstaFire

Tonight, as I was trying out my poor man's wood stove, I thought I'd try InstaFire as a fire starter. The bag suggests to pour out about 1/4 to 1/2 of the bag to use as fire starter. However, if you have your kindling ready, you just need a spoonful of InstaFire to get things going. That is what I did tonight--one spoonful.
I lit up the InstaFire spoonful with my Bear Grylls' ferrocerium rod. After four strikes, the sparks landed on a small lump of InstaFire. The lump began to burn immediately. I dumped the lump of InstaFire into my wood stove with my kindling already piled up inside. The kindling started to light up within seconds.
I sealed the opened bag of InstaFire in a Ziplock bag and will leave it in my wood stove. I think I can use InstaFire as a fire starter for at least six camping trips.
Wood stove, part 3
Well, I did the test today with the new holes at the top of the stove. Those holes are not big enough. As soon as I place a pot over the entire surface of the inner can, the fire gets choked up. I think I need a cross grill placed over the inner can.
Wednesday, September 5, 2012
Wood stove, part 2
Well, I ran my test this past weekend at the Cyprus Lake national park. It worked extremely well. I thought the outer can would be warm or cool to the touch. Man, was I wrong! It was super hot! Once lit up, I could clearly see jet flames coming out of the upper holes in the inner can. The whole thing worked so well that all the wood I placed inside the wood burned into ash within 10 minutes. I think that would be long enough to boil maybe a litre of water.
Now, a small alteration to the inner can ... I have just made a bunch of holes at the top of the inner can. This way, I can place a pot directly on top of the inner can and air can still escape from the inner can.
The aluminum hollow disc at the bottom of the picture below is used to cover the space between the inner and outer cans.

Saturday, August 18, 2012
Wood stove
After seeing so many YouTube videos of the hobo stove and other wood high-efficiency stoves, I decided I'd build one myself. So, after eating the contents of two cans, here is the stove:


I will cover the side of the inner can with a cut-out aluminum plate. I will test this on my next camping trip.
The inner (smaller) can sits on top of three 1/2"-long bolts, and kept from shifting inside the larger can by three 1/2"-long bolts on the side of the larger can.
Top side of the poor man's version of a camping wood stove.
The holes on the bottom were punched with a nail. A number of them were enlarged with a drill bit. All the other holes on the walls were punched with a nail first then enlarged with a drill bit. The drill bit tore through the can as if it's paper so it left very jagged edges. I had to use a hammer to flatten down / smooth out the the jaggedness.
I think I will fashion a stand for a pot with a coat hanger.
Monday, July 2, 2012
Ozark Trail Scout Junior Dome Tent, my review
The Ozark Trail Scout Junior Dome Tent has undergone a couple of tests this past week. I took it for camping at the Fundy National Park in New Brunswick and at the Cape Breton Highlands National Park in Nova Scotia.
The Fundy National Park was a real challenge for any tent. It was obvious though that this tent would have gotten me into a lot of trouble had it not been for a tarp I set up right over the tent. Even with a tarp over it, the tent allowed water in. I noticed that water was getting in at the seams where the product label and the mesh pouch were stitched to the tent. Water was dripping in slowly, enough to get my sleeping bag all wet if it were not for the foam pad I used under the sleeping bag. (It would really suck if my sleeping bag did get wet!)
Now, the tarp did not protect the entire tent. That was my mistake. I let one side of the tarp to droop over the side of the tent that leaked water in. The depression in the tarp allowed water to collect and drop onto that side of the tent. It was just too much water. I eventually realized the mistake and fixed it but still, there was enough moisture in the air that water was still building on the wall of the tent and eventually seeps in through the seams.
The Cape Breton Highlands National Park presented a different challenge to the tent. This time, it was brute force wind. I had no idea how strong the winds were but in the middle of the night, the wind was so strong it felt like the tent was going to collapse onto me. I did not get much sleep that night. I do not know whether it was because the wind was so loud it kept on interrupting my sleep or that I woke up whenever the sides of the tents were closing in on me. Well, the tent held up quite well. The poles were flexible and strong enough to hold up to what I think was probably 60 km/h winds. I was camping on a cliff of the Corney Brook campground in the park, so we were getting the full force of the wind out there.
In terms of the size of the tent, although one side is six feet long and I am 5'7", it's too short for me. I had to sleep in a diagonal. This tent is really a one-person tent for me then. The smaller size of the tent allows for easy setup and tear-down. It can easily be set up in 5 minutes. Tear-down was equally quick.
Thus, would I take this tent on another trip? Maybe. I will have to think about sealing the seams. The rain fly covers only the top so there is only one layer between you and the rain. I would have to bring a tarp along, so I actually pack the tarp in the same carrying bag as the tent now. The tarp is easy to set up in a wooded area but in the open space of the Corney Brook campground, I had to fashion a couple of pegs out of tree branches and staked in the ground.
Sunday, June 24, 2012
Ozark Trail Scout Junior Dome Tent
With 24 hours to go, excitement is building up. I am in Halifax and will be heading to Fundy National Park in a day. I will be setting up tent with the 2-person Ozark Trail Scout Junior Dome Tent for the first time--I should have done a test setup back home first ... oh well. We will see how it keeps up with the weather. It's been raining on and off in Halifax. I suppose it will be not much better in Fundy National Park tomorrow.
Saturday, June 2, 2012
City Slicker, part 3
As of the beginning of this week, that tent under the bridge is gone. In its place, more to the right of where the tent used to be, is a smaller dome tent. There are more backpacks around that around now. I think the street family is moving in ....
Ozark Trail Scout Junior Dome Tent
 I am planning a trip to Nova Scotia. I will be camping for a couple of days in the Cape Breton Highlands National Park. My backpack is going to be heavy and big so I need to reduce its size and weight somehow. The first thing that will go is my 3-tent tent. It is relatively light but it is at the same time heavy and big, too big for me to easily find space in my backpack.
I was browsing around Walmart looking today for a car roof rack when I came across the camping section. I picked up this Ozark Trail Scout Junior Dome Tent for less than $18. It is a 2-person tent meant. Is is "Junior" because I think it is meant for kids. I am not that much than the tall kids these days, and this tent footprint is 6'x5'. Sleeping diagonally, I would have plenty of room. I would have enough space for my gears and boots that I will haul inside the tent.
There are only two colours to choose from: blue and orange. I picked orange. I think it blends into a forest better and can stand out more in the snow (if the purpose is to attract attention--for a rescue for example.).
I think the only problem I will have with this tent is that the rain fly is a small. The 3-men tent I have can withstand quite a bit of rain. So, I bought a tarp to go along. The whole thing is still lighter and more compact than my 3-men tent. Maybe another problem (that other people have reported) might be the poles ... they tend to snap, I read. The poles are definitely thinner than those for my 3-men tent.
We will see how things go at the end of June.
Monday, April 16, 2012
City Slicker, part 2
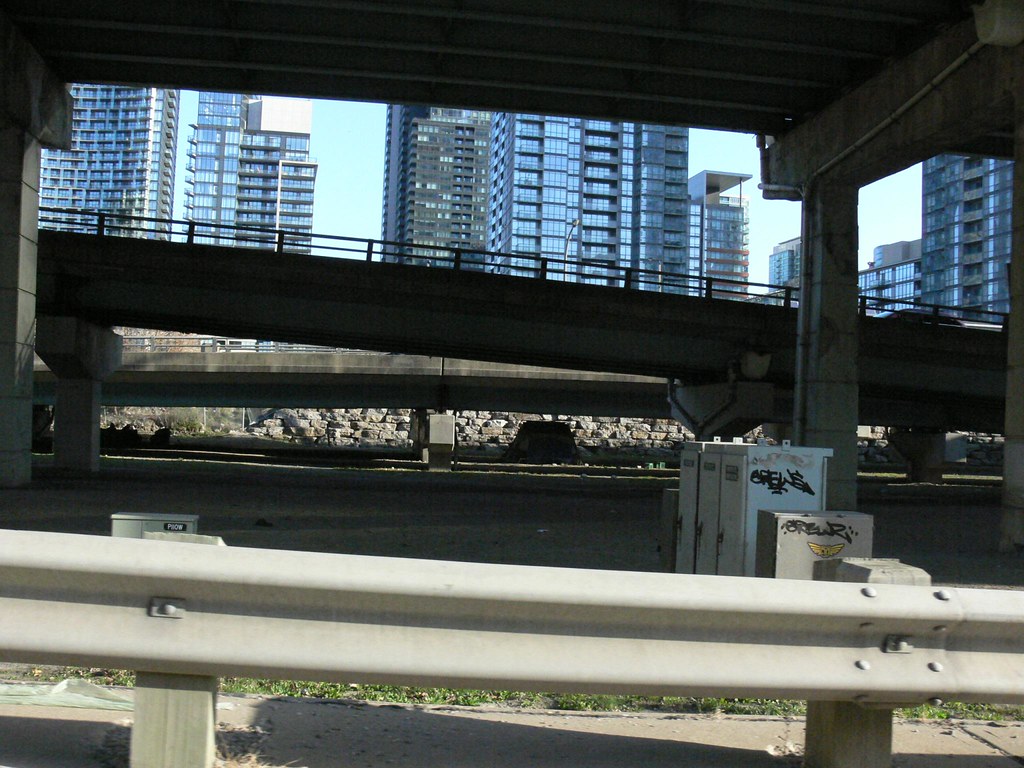
That tent is still up this morning when I passed by it. It has been a week and I'm surprised the city has not learned of it. I guess no one really cares that it's there. Well, the thing is, most people taking this exit from the highway are coming from outside the city, so it doesn't bother them that this fellow is camping under the bridge. The high-rise just north of the bridge cannot see the tent so no one really knows. It'd be interesting to see how long it will persist.
Sunday, April 15, 2012
My current tent
 |
| Car Camping |
This Outdoor Works Summit tent has withstood heavy rain and wind. The sleeping area is 7'x7', made for three people. I have had three people sleeping cozily in it but I think it's much more comfortable when there are only two. In the picture, my tent is to the left. The sleeping area has a mesh wall. What you see is the outside rain cover.
Under the rain cover, there is vestibule outside of the sleeping area. The vestibule is great for storing your backpacks and other gears, keeping them out of the rain. When there are only two people in my tent, I would bring my backpack into the sleeping area, so it would be easier to access camping equipment or more clothes at night, should I need to.
I like this tent a lot. I do find it a bit long to set up. It has three poles--two to create the arches over the sleeping area and one to create the arch of the vestibule. It would take me maybe ten minutes to set things up. In the rain, that might be too slow.
The tent is not too heavy. I can take it with me while doing interior camping. Compared with much more expensive tents designed for solo camping, this is heavier and is harder to set up though.
Well, it will do for now.
Friday, April 13, 2012
City Slicker
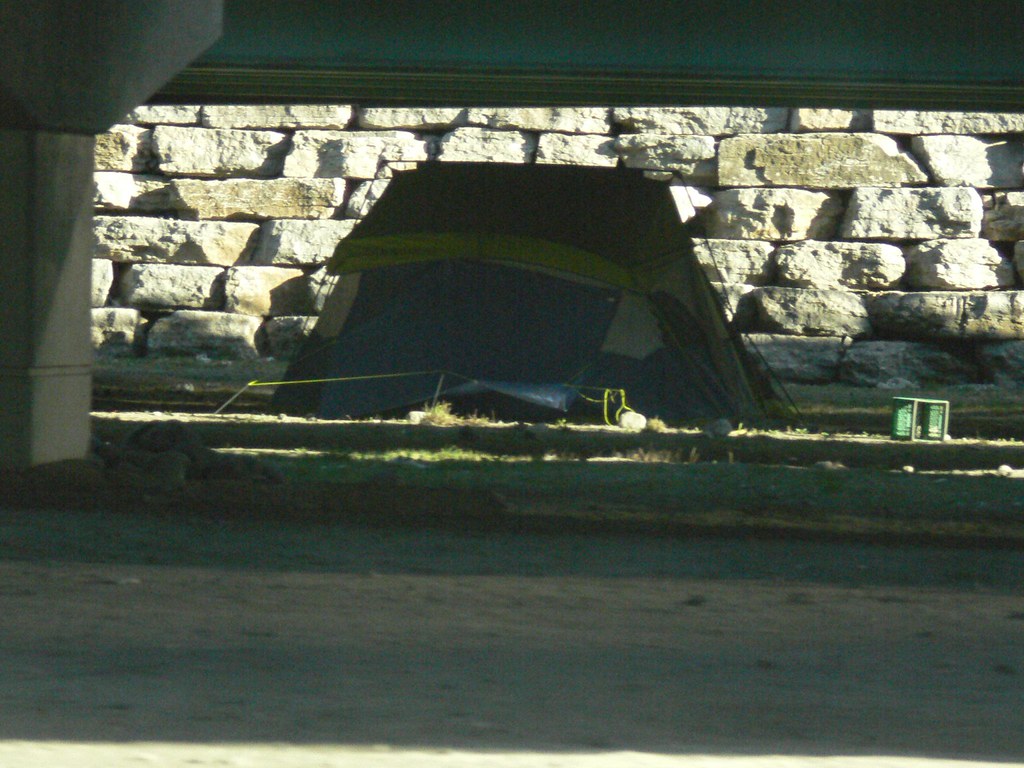
What's more exciting than camping under the stars?
Camping under a kiloton bridge. Out of nowhere, I noticed something odd off to my left down a ramp as I exited the highway. It took me three days before I could take any photo of this metropolitan camper.
Years ago, there was a shelter built somewhere under a similar bridge. It lasted for a while under city officials took a whiff of it and came in with the police to clear the area. It was too bad I thought. I did not get a chance to take a picture of it. I had no idea where it was except that it must have been close to this location. Well, it's back. Something is back. Maybe it's the same guy. Maybe he'll last longer this time around.
All the best, to all campers, homeless or not!
Tuesday, April 10, 2012
Amazon.ca
This is crazy! The Leatherman Wave multi-tool I purchased on Sunday arrived today! The way Amazon.ca works, I see little need to shop the stores around here. I can order everything online and the next day, it'd arrive. Sweet.
Monday, April 9, 2012
Amazon.ca
Well, I am impressed. The Gerber knife I ordered on Sunday arrived today. I was lucky enough there was someone at home during the day to receive the package from UPS. Amazon.ca must have a lot of retailers they deal with in Canada. Now, let's see how fast the Leatherman Wave multi-tool takes to arrive.
BTW, the Gerber knife looks really cool! I cannot speak for its performance yet, but it looks cool.
BTW, the Gerber knife looks really cool! I cannot speak for its performance yet, but it looks cool.
Sunday, April 8, 2012
Gerber 31-000751 Bear Grylls Ultimate Knife
 I ordered a Gerber 31-000751 Bear Grylls Survival Series Ultimate Knife earlier today. What for, I asked myself? I mean, what's the likelihood that I will ever be in a survival situation. Almost never. I don't often go far off the beaten path. I usually hang out with friends and follow the marked paths when hiking. The parks I frequent can be quite big and you can get lost in them, but again, the itinerary is usually frequented by many other campers so it's unlikely that I will be stranded in a survival situation.
Well, I bought this knife because it received a lot of good reviews and because there is always a small chance that one of those days that I veer off the beaten path, I might be stranded and lost by myself. It's hard to do this, especially when your friends are always around. There could be a chance I might decide to go off on my own one of these days. I have, in the past, traveled solo into a third-world country, foraging in dense forest with little preparation. I could have found myself in trouble if anything happened to my two guides. I might end up having to rely on a good knife that I would hopefully be carrying with me. All I had was my Victorinox pocket knife. It would not have been very useful. This Gerber 31-000751 knife however would have been almost a necessity for survival. It has a strong blade that can be used to chop down branches to make shelters and it comes with a fire starter rod. Fire is unquestionably a big morale booster at night, besides preventing hypothermia. It is one big plus in my book, for survival.
When I do my interior camping trips this summer, I sure will bring this knife along. I don't expect to have to use it, but one never knows.
Leatherman Wave multitool
I have always carried around a Victorinox Swiss Army Recruit pocket knife. It is compact and light. It goes easily into my pocket, dangling from a strap tied to my belt. It has been very useful on many of the camping trips I took. The can opener proved itself useful a couple of times when I forgot to bring a can opener along. The knife obviously had been used more than a few times to cut open food packages, make marshmallow sticks, slice hotdogs, cut bacon strips, etc. The Victorinox knife is super sharp--I have cut myself a couple of times already.
 I thought yesterday I might just need a multitool, one with a plier. I decided to purchase a Leatherman Wave multitool. It is not a cheap multitool but with 25 years of warranty, I like to think that I'm paying only a few bucks a year.
The Leatherman Wave multitool has received exceptional reviews. It is a little heavy to carry around however but I suppose good quality tools are made from heavy quality materials. I purchased a leather and plastic sheath so I can wear it on my belt.
My order will arrive in a few days. I will not be able to use it until my next camping trip. I am not sure if I will be able to make good use of this multitool. Did I buy it on impulse? Maybe. We'll see.
Subscribe to:
Comments (Atom)